Sunday, April 26, 2009

Stained Glass Designs

I started to try and make a complementary design to go with the rose panel I made in my first stained glass class. (I posted the panel I made in class a few days ago.) I think I will use similar colors but nothing too matchy-matchy.


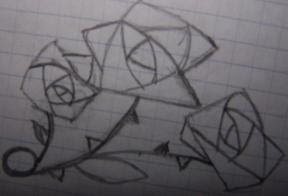
Anyways, here are the beginnings of my rose panel designs. Basically, I wanted to mimic the same lines and flow in the pattern, with the same rose style, but change up the layout and the number of elements involved.

They both still need work. I think that I am leaning towards the one on the left, with some modification.

I am still on my quest to buy a soldering iron. I am not sure what style I need and so on. There are a ton of different types and styles out there so I am not really sure what would be the best for me and what I want to do. I have found a number of them online. I am usually really into shopping online but for some reason this time I really just want a person that knows the craft to talk to me about the irons and sell me what I need.


Until I find a store or do more research online, I am sort of at a stand still on the glass front.


This is the final design I am working on. I am making a key chain bauble of my glass studio key. I think it is appropriate that it would be something I made-- You need creativity to access my create space. ^_^

On a final note I do want to say-- I am pretty suprised about how much I seem to love roses and flowers in stained glass. I know I am generally a romantic kinda girl, so that does make some sense but I thought I was into the geometric designs more than images... We shall see, shan't we?

Sunday, April 19, 2009

Studio? -- Check!

I am so excited. It took a bit of time to get everything arranged just so for me this weekend, but I got my studio all set up. I took bits and pieces from all over the place to make it happen. I made use of some of the wood and the saw horses that were left behind by the previous owner.

Following that, I made a list of the items I both needed and wanted in order to make stained glass. I purchased the basic tools from my class teacher earlier last month. I went shopping in my parent's garage and found most of what you see here before you in terms of furniture. Mom gave me that potter's table on the left which I think will be amazing for holding my works in progress as well as tools. The two round stools were also my mom's -- garage sale finds! I have cusions fo both of them if I want a padded seat. The milk crates where my glass is stored was from dad. He also found those hiddieous lamps that are on either side of the table. They used to be my grandfather's before he moved in with my aunt. The funny little trash can in the corner was actually a pail that my mom got at my sister's baby shower in 1979. (Yay, recycling!)


Fireman Baby Booties


Fireman Baby Booties – Free Pattern
Designed by Shannon Gallagher


Materials:
1 oz Red Heart Super Saver – Black

1 oz Red Heart Super Saver – Yellow (or any appropriately colored worsted weight yarn)

5mm “H” hook


For sizes:
Small – 3.5 inch sole – 0-6 months
Medium – 4 inch sole – 6-9 months
Large – 4.5 inch sole – 9-12 months

Pattern:

Worked in the round throughout pattern. Be sure to weave in the tails where indicated.

Using yellow yarn, ch 8.

Rnd 1: hdc in 3rd ch, dc next 4, (6 dc) in last ch, working on other side of chain hdc next 4, (3 hdc) in last loop. Join to beg ch 2.

Rnd 2: ch 1, (2 sc) in same st, sc next 8, (2 sc next st) 3 times, sc next 6, (2 sc in next st) 2 times. Join to first sc.

Rnd 3: ch 2, hd in same st, 2 hdc next st, hdc next st, sc next 6, (sc, hdc) in next st, (2 hdc) next 4, hdc next, sc 7, hd next, (2 hd) next 3. Join to ch 2. Fasten off.

Rnd 4: ch 2, sc in blo around. Join to ch 2. (34 st plus ch 2 – be sure to check here)

Rnd 5: ch 2, hdc 12, (sk 1, hdc 1) 4 times, hdc to end, join to ch 2. Fasten off. Weave in tails.

Rnd 6: Using black yarn, ch 2, hdc 9, (sk 1, hdc 1) 4 times, hdc to end, join to ch 2.

Rnd 7: ch 2, hdc 9, (sk 1, hdc 1) 3 times, hdc to end, join ch 2.

Rnd 8-11: ch 2, hdc 21, join ch 2 (at Rnd 11, Fasten off)

Rnd 12-13: Using yellow yarn, ch 2, hdc 21, join ch 2. (at Rnd 13, Fasten off)

Rnd 14: Using black yarn, ch 2, hdc 21, join ch 2. Fasten off. Weave in tails

To make handles: Attach black yarn to top of boot. ch 10.Join to boot, leaving 4 hdc between

Booties for Everyone!


The top pair of booties are supposed to look like bear feet. I am not sure I like how they turned out entirely
I made these booties for my co-worker's baby shower this week past. Mike is a firefighter and his wife used to also be a volunteer firefighter before they were married. They are having their first child-- a little girl-- due next month.
I made 22 bootes, 2 for the little girl and 20 to be used as shower favors.

Sunday, April 12, 2009

Stained Glass Hand Mirrors

I have begun a new stained glass project. I stopped by Stained Glass Decor in Media on saturday after a terrific trip with Dawn.


I picked up the supplies to make five hand mirrors. What I am going to do is take the ful colored glass circles you see here, solder mirror onto the backs of them, and create a fun design using copper sheeting and tinning. the hand mirrors will turn out to look like something like the picture below... only with glass and not fabric making up the back decorative design.
I looked all over the internet for an example of the copper sheet/tinning element but I can't seem to locate a perfect example. Here is a picture I did find, but it is a little hard to see what is going on in it. The purple flowers are all one single piece of purple glass. The artist used the overlay technique to make the glass look like several pieces of glass that we joined together by solder.


Next steps? Set up my studio at home and grind down the rough edges on those circles and the mirror circles I cut yesterday. Then it is foiling, soldering, designing ther overlays, ect.

Wish me luck!

Tuesday, April 7, 2009

Stained Glass Class!

I have always wanted to learn how to make stained glass. A co-worker told me there was local store where you can learn called Stained Glass Decor in Media, PA. The store is owned by a woman named Patty who teaches novices on the side. She was terrific!

The class was on Wednesday nights from 6pm-8:30pm and ran for 5 weeks. If you need more time to finish between weeks, she offers 4 hours on Saturday that you can come in a work while she is working on her own projects for customers. She limits enrollment to a maximum of 4 people to ensure hands-on and personal attention (as well as she has limited space in her store). At the end of the class, we ended up with a 8 x 11 project. We choose our own design so really you could come with your own pattern if that is what you want. I, personally, chose a pattern out of a book and Patty re-designed it for me for size and skill level purposes. I think it turned out really well (see above). It is pretty girly, which is pretty much my style. I like romantic, traditional things. Then again, I also like quite a wide variety of things so that doesn't always hold true to everything.

The class sessions broke down as follows:

Week 1 - Basics in glass cutting, choosing a stained glass design, and safety tips
Week 2 - Cutting glass for the project and filling to pattern
Week 3 - Grinding edges to fit pattern
Week 4 - Foiling glass pieces and beginning soldering
Week 5 - Soldering, framing, and applying finishes

The really awesome thing? Dawn (my co-worker) and I finished the class a week early so Patty had us both back for an additional class where she taught us to make boxes and solder in 3D. We learned how to work with mirror (the purple/blue glass in the top and on the bottom is mirror glass) and used bevels (also seen on the lid). Patty showed us how to make invisible hinges, which was pretty cool.
Dawn and I have now bought our own tools. I am making an area in my 2 car garage for me to work on projects this summer. I am really excited to make more stuff! Some of the glass out there is so cool and really inspiring. We are planning a road trip to some speciality stores soon. Wish us luck!


Monday, April 6, 2009

Breast Cancer Awareness - Crochet Square Swap

I am currently working on a pink Breast Cancer Awareness blanket thru a Afghan swap I found at the Yarn Lover's Room.

How the swap works: If you want to join, email the person listed as the swap host(ess). You make crochet or knit squares as according to the requirements. At the end of the swap, you mail your squares to each person that joined the swap, keeping 2 for yourself as well.

Required for this particular swap -- using only worsted weight pink yarn, make two 7 inch squares for each member of the swap. We had 15 people join the swap, so I had to make 30 squares. I made some extras as well to beef up my finished blanket. I loved the oppertunity to try new patterns and designs without the pressure of having to comit to the same pattern for the whole afghan.

In the picture here, you can see all of the squares I have recieved so far thru the mail. I am really impressed with the different shades of pink that were used! I love love love the color pink (one of the main reasons I joined the swap) and I am really excited to see the finished product.

Now, I have to figure out how I want to join the squares together. Black? White? Green? And what joining method? I have alot to consider. Any ideas?

Sunday, April 5, 2009

Princess Crafts-a-lot

I love to read other people's craft blogs. I meander thru my favorites on my lunch break at work and ... really whenever I have the free time.

I enjoy a gambit of different crafts. I am always telling people that I like to learn new things, which is probably why I try my hand at so many different things. More on this later.


I just wanted to post that I am excited to start my very own blog. I hope to post regularly-- I tend to do something crafty everyday. I promise to post my WIP (works in progress) as I am getting time with them as well as my finished products.

Anyways, more later!