Showing posts with label pattern. Show all posts

Friday, July 22, 2011

Domo Kun! Softie

I made my first sewn softie this week for a swap on Swap-bot.com.

I found a tutorial on Cut Out and Keep that I liked for the general idea of the little guy. I made him with a faux fur remnant I bought at JoAnn's. I have never used faux fur before but have used materials that shed such as terry and minky. This was by far the messiest material I have sewn to date. The end effect bascially was a Domo-in-need-of-a-Haircut. He's cute and about to devour my soup... oh no!!
I liked him-- just wish I had used Ami eyes and not buttons. Aside from that, job well done :)

Friday, April 15, 2011

Mini Ami Octopi

Super Cute!
I made a few of these little critters over the weekend. These two have taken up residence on my sister's desk at work. I love how customizable that they are. I played around a little with the eye type and size as well as the accent pieces. I am not sure which I prefer. I do know that I need to bust out all my plastic safety eyes to size and label them. They are all over the place now and I never know if I am using the pattern recommended eyes.

As for the pattern itself-- it was very easy. I have already recommended it someone that wants to make her first Ami. Basically, you make a ball, stopping close to the end to add eyes and a hair jewel. Close up the ball. Next, you make a ring of stitches and chain out like spokes. There is very very very little seaming which can be frustrating to new crochet artists. In this pattern, the tentacles are all made together-- you just join the bottom of the ball to the top flat area of the tentacle ring. The curly legs are so cute and allow you to even entangle them if you want to.

My sister also found out that the little guys are stack-able! I should have taken a picture in hindsight but she had 5 stacked on her desk and they were very stable.

Sunday, March 6, 2011

Beginner's Bias Tape Bag (by Prudent Baby)


I came across this super cute bag on Prudent Baby's website this week. Check it our for yourself-- I highly recommend it.

This pattern was amazingly amazing-- quick to work up and simple to understand. I also now feel like bias tape isn't as scary as I was feeling before. I made three of these bags this weekend. The tutorial shows how to make the smaller bag on the bottom that I have done in green and orange. It works up to be the size of a small handbag, using 2 fat quarters and 50 inches (or less) of bias tape. It fits my sunglasses, wallet, camera, phone, and chap stick easily. Jaime also recommends using a photocopier to enlarge the pattern to make a larger bag. I enlarged it to 200%. It took two yards of fabric and approximately 95 inches of bias tape.

After finishing the larger green-toned bag on the top, I ran out to the fabric store full of inspiration. I was invited to a baby shower for my good friend and her husband (also a good friend). I always have a secret giggle watching men struggling with carrying a diaper bag or holding their wives' purse. I was thinking it would be great to make a reversible bag for Kim and Jim-- pink for her and Superman for him. Kim is having a boy (her second) which means she is surrounded by super heros and blue all the time. The girl needs a good shot of pink in her life-- and I am just the pink-lover to give it to her.


 Here is how it came out! This is going to be my new go-to baby shower gift, I think. After all, it is the parents that are carrying the bag, not the kids. They should be something they want to have under their arm!

My one disappointment is that with it being reversible, I was unable to add any pockets. If I had more time, I would have made some organizers that they could use on the inside of either (so probably in neutrals like black or white). Regardless, they loved the bag and I was happy to give it to them!

Monday, February 14, 2011

Pattern Review: Pieces of My Heart

I used Melissa Mall's Pieces of My Heart crochet pattern to make this pink and green pillow, modeled by my boyfriend, Ian. See, he even showed us that the pillow is fully-functioning!
 Thank you, sweetheart.

As far as patterns go, this one was quick and easy. The heart is made up of three parts, two half circles and a square, all seamed together. The sides are just straight lines of single crochet that you seam to the sides of the two hearts. You stuff the heart with Fiberfil, not a pillow form so it is up to you to make the pillow shaping work.

Friday, February 4, 2011

As Promised-- Photos!

I *finally* got the camera situation under control! Also, I bought Photoshop!! I used to have it back in college but that was many versions ago. Ian bought me a laptop for Christmas so I have a new machine and new new Photoshop.

As promised, here are the pictures from the two purses I made as presents last week.


As I had mentioned before, I used the Buttercup purse pattern by Rae. The black, white, and grey purse with the sunken zipper was made for my boyfriend's mother (as a Pollyanna Christmas present). I gave it to her at Christmas part 4 this past Sunday. She loved it and so did our cousins and aunt. I see some more purse-making in my future.

The orange lined glitter-fest I made for my friend Sam. She was super-great to me two weekends ago when I really needed a friend and she totally deserves a surprise. I hope she likes it.

Thursday, January 27, 2011

Camera Woes

After all of the crazy craft rush towards Christmas,  I took a few weeks off from creating.

This week I am back in the saddle again! I made two cute purses using the Buttercup Bag pattern that I found online (for free!)

My camera is being stupid so I cannot post pictures yet-- but I will.
I will, however, describe them here.

The first bag is made with a nylon sequin fabric in teal and black-- sparkly and so cute! The bag has a bright orange lining and a magnetic closure. I made that bag for my friend Sam. This weekend past she really took care of me and I wanted to make something for her to show how much I appreciated it.

The second bag I made with black, white, and grey dotted fabrics (3 different patterns). I used a sunken zipper modification on the pattern and sewed the handle into the top seam between the lining and the exterior. This bag I made for my boyfriend's mom. It is her Christmas Pollyanna gift. In his family, Christmas happens 3 times a year with different sections of the family. This Sunday is the 3rd Christmas this season at his grandmother's in Maryland. I hope she likes it. His mom isn't really frivolous (like me) so it was really hard to figure out what to make/get her.

Pictures pending, I promise.

Monday, December 20, 2010

The Annabelle Apron

Our corporate office has a Christmas party every year with a theme. Last year, we had a Wild West Christmas, complete with a mechanical bull. This year, it was the Food Network. To go with the theme, we had an apron contest. Contestants were to create or decorate an apron and model it (and your story if you have one) at the party.

I have never made an apron before, but I thought that I would take a stab at it (while still making too many crafts as Christmas gifts:-) ) I went looking for a cute pattern online that would show off my new svelte figure. I am officially down 141 pounds-- check me out!

This is the Annabelle Apron by Hoffman Fabrics. I fell in love with the picture posted with the pattern so I thought I would take a stab at it. The pattern was really easy to follow-- and I LOVE the results.

I won 3rd place and a $50.00 American Express gift card. Not too bad... and even better, I felt very pretty. The pink, love, black and white are right up my alley. Add a tiara everything would be perfect!

Saturday, December 11, 2010

A Christmas Plushie

So, Christmas gifts for my father can sometimes be difficult. Not that he is difficult but he never lets on to what he wants or needs. Usually, I get him some dress shirts for work, maybe a superman t-shirt, and a gift card to Home Depot. There is ALWAYS something to fix at my parents house, it seems, and dad gets a thrill out of fixing things for free (well, free for him anyways).
I was in Home Depot looking at light bulbs and happened across a cute little apron gift card holder. Perfect! So for Christmas, I am looking  make a mini Dad and put the apron with his gift card on the plushie. It is my first plushie so I started off drawing out a cartoon likeness of him.(That's Dad with my nephew Dylan.)

What do you think? Not bad!

I'll keep you posted on how it works out.I am hoping for good things-- this is my most brilliant Christmas present idea yet this year!


Friday, August 13, 2010

Testing, Testing... All about Pink


I've been working on making pink squares for my pink afghan for quite some time. Here are a few more (discounting the purple/teal/white square on the left). In order of appearance here, they are a fillet heart from the book Crochet Blocks in a Box, Fox's Scrapity Scrap - Pretty Buds, Fox's Mulberry Bush, and Fox's Geometric Square. This weekend, I will have to lay out all of my blocks and take a picture of my progress. Something tells me that I actually have enough for more than one afghan now.

We shall see.

Brown's Back in Town

I have been neating up my crafting room recently and I happened upon some brown fuzzy yarn that I had totally forgotten about. With bunnies on the brain, I knew exactly what I wanted to whip up. A Dust Bunny! It would probably make more sense to use fuzzy gray yarn-- but whatever. I used a pattern I found on Lion Brand's site some time ago.
After I finished that up, I used the left over brown from the bunny's ears to make a bear. This was a new technique for Ami for me because you attach the legs as you go along. (Usually I attach them by sewing after each piece is complete.)This was so much faster, but a little less convenient. I had to pack stuffing in my traveling crochet bag. I usually save the stuff-and-assemble for when I am home so I can play around with the weights and devote some time concentrating on the project. So much of crochet is mindless :)

I have also learned now that I am looking at the pictures to upload my images before gifting my projects to people. It seems that with the dark brown colors, none of my images turned out. Yikes. Really, the bear was so cute with his bulbous hands/feet and cute little ears.

Tuesday, August 3, 2010

Per-Hops I Should Try Again?

I am not great at figuring out the sizes of baby heads, apparently.


I wanted to make this adorable bunny hat using the pattern I found at Mama G's Big crafty Blog.The first one I made is on the left, in white. I used Red Heart yarn, which is a little too scratchy but I was more thinking of seeing what I came out with more than him actually wearing it. He was born in May, after all. I realize this is not his noggin' size by October... but I thought it would make a cute picture to put him in among my live bunnies ^_^

After my sister pointed out how hopelessly small the hat was (off by @ 3 inches, which is alot with a yarn that has no give and a baby head that is only 15 inches around.) So then I made the brown hat on the right. I added more (10) stitches to the ears and to the hat itself and used Caron Simply Soft, which has a little give and felt nice. This hat is (not surprisingly) too big. And by extending the ears while using a yarn with less body, they became super floppy and too heavy for the pattern. So I will try again!

I am sure Lucas can wear this hat eventually as his little head grows... I'll let you know if the ears prove to be the downfall.

All in all though, super cute pattern! I hold my yarn too tight. I am fairly sure that is where the sizing issue came from.I'm not sure there is anything I can do about that other than just be aware of it and add stitches as needed.

I'm still a beginner at crochet ^_^ but I do like it!

Tuesday, July 27, 2010

What's on your hook?

Today, the yarn I ordered online came! I love getting packages in the mail-- it's like Christmas, only I paid for it and generally know what is inside...
I am pretty excited because I have been dying to try my hand at felting again.If you remember, I tried to make a felted candy corn bag back in October-- it didn't turn out quite right. One of my readers explained that I had probably used a wool-blend yarn. Well, this time I bought the 100% stuff so I hope all this itchiness in July pays off in the final product.

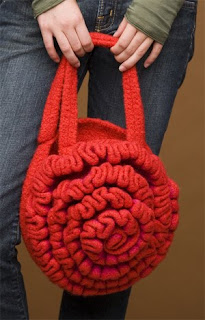
 I found this cute pattern on Lion Brand's site last week called a felted rose handbag. Pretty darling-- I bought different colors though. The hot pink-and-red look doesn't really suit me. I purchased Ranch Red as the overall color and Scarlet as the accent in the rose petals.

So what's on your hook?

Monday, July 12, 2010

Christmas in July

I participated in a Christmas in July swap this month. I found this cute little tree ornament to make for my swap partner. It was a quick work up and fun to make in the off-season. The tree is made in one piece with the star and the snow garland added after the tree is made and stuffed.

Enjoy, my friends... and make one yourself! It only took a half hour, before adding decorations.

Stick a Needle in me... I'm Done!

I have been meaning to make a new pin cushion for myself as I have been doing more and more sewing. The idea to make a cactus pin cushion from crochet hit me several weeks ago so I set out to write up a pattern. Please let me know if you have any questions with the pattern I made. It is untested other than in my own wild-brained logic. 
Enjoy!
To make a Mr. Cactus pin cushion:

You will need:
Brown Yarn (B)
Dark Green yarn (DG)
Light Green yarn (LG)
Polyfill stuffing
Crochet hook 3.5 (E)
Terra Cotta pot or other small pot

Base (Dirt):
In B, make a magic ring
Round 1: 10 sc in loop
Round 2: *1sc in first st, 2sc in next st* Repeat (*) 5 times
Round 3: *1sc in first 2st, 2sc in next st* Repeat (*) 5 times
Round 4: *1sc in first 3st, 2sc in next st* Repeat (*) 5 times
Round 5: *1sc in first 4st, 2sc in next st* Repeat (*) 5 times
Rounds 6 - 9: 1sc in each sc (30 total)
Round 10: *1sc in first 4st, sc2tog * Repeat (*) 5 times
Round 11: *1sc in first 3st, sc2tog * Repeat (*) 5 times
Stuff
Round 12: *1sc in first 2st, sc2tog * Repeat (*) 5 times
Round 13: *1sc in first 1st, sc2tog * Repeat (*) 5 times
Cut yarn, leaving a long tail

Trunk:
In LG, Make a magic ring
Round 1: 8 sc in loop
Round 2: *1sc in first st, 2sc in next st* Repeat (*) 4 times
Round 3: *1sc in first 2st, 2sc in next st* Repeat (*) 4 times
Rounds 4 –13: 1sc in each sc (16 total)
Stuff
Round 14: *1sc in first 2st, sc2tog * Repeat (*) 5 times
Round 15: *1sc in first 1st, sc2tog * Repeat (*) 5 times
Cut yarn, leaving a long tail

In DG, Chain 52. Verify length fits around entire cactus prior to cutting yarn
At chain 26, attach yarn with a slip stitch and chain 25 (6 times)
Sew chain cluster to cactus trunk, leaving space for branches


Branches (Make 2)
In LG, Make a magic ring
Round 1: 8 sc in loop
Rounds 2-4: 1sc in each sc
Stuff
Cut yarn, leaving long tail to join with trunk


In DG, chain 30 (Make 2) and leave them aside

In DG, sew length of 9 chains to each branch side (in quarters)

Sew branches to trunk, sew remaining lengths of chain to the ends of the branches where they meet the trunk

Sew cactus to the dirt patch.

Secure in pot with hot glue, tacky glue, or your favorite adhesive

Tuesday, July 6, 2010

Starburst Hot Pads

I started making these little beauties and couldn't seem to make myself stop
At first, they appear complicated but in truth-- they are quite easy to work up. They are actually five separate granny squares that are seamed together via the surrounding single crochet row. It seems that there isn't such a thing as a bad color combination with this pattern.
I got the pattern here if you would like to make some of your own. Just remember-- use natural materials (preferably cotton) in making them if you intend to use them as pot holders. They have to be able to stand up to the heat!

Monday, July 5, 2010

Beta Testing

I was selected to test out SmoothFox's newest granny square pattern, Fox's Ripple Star Square, 12x12.

I had a good time working on the pattern was alot of fun. I really enjoyed how it worked up. I have never done a 12x12 pattern before. I think that I may have to make a few more in the future.

Take a few minutes and check out SmoothFox's site. There are a ton of patterns there-- afghans and squares for sale and for free.

Good stuff!

Saturday, May 29, 2010

Dropwaist Skirts - Not so hard!


Over the past two weeks, I took a class at the Viking Sewing club and learned how to make a tiered skirt and a dropwaist ruffled skirt. I then set out to make one for each of my sisters-- which sounds easy but was a bit challenging considering one was in her last month of pregnancy. Everything turned out really cute.

The basics are simple. First, you want to measure your waist. Cut your elastic to that size plus 4 inches. Cut your top fabric to your waist in length and 9 inches in width. Measure how long you want your skirt to be in total. Subtract 7 from that number and that is how wide you want your ruffle fabric to be. Leave that material as long as you can. You will end up piecing together two or three of these lengths to make the skirt in total. I used the gathering foot on my machine but there are other ruffling methods out there. After you create your ruffle and attach it to the top tier (or if you have the gathering foot, do both in the same step), you sew your bottom hem and sew in your waistband in a double folded fashion. I had each sister try on her skirt so I could cinch in the elastic before I finished the seams.

Monday, May 17, 2010

Hedgehogs on the Web

I have been doing a little research on plushie and softie making today. I want to make a humanoid one for a surprise I am making for my boyfriend.

While searching for ideas, I came across some really cute hedgehog patterns/tutorials that I would like to share with you!

Ruffled Hedgehog tutorial at Matsutake
Also, Lickin Lollipops used the same tutorial with some cute patterned fabric-- Too cute!


Hamie the Hedgie at LollyChops (in teal, of course!)


Sammy at Warm Fuzzies


Pinecone Hedgehog at Kiddley


Pom-pom Hedgehog at Zakka Life

Sunday, April 11, 2010

Baby D Progress

As you may remember, I have been working on squares for an activity throw for my sister's baby. I am making slow, but good progress.


This is the next square I will be working on. On top of the pattern is a skein of my inspiration yarn Premier Yarn's Serenity Garden - Gems. The pattern is one I have free from JoAnn Fabrics called Caron Simply Soft Multi-Petal Flower. I bet they have it on their website if you want to try it out too.


I have also been working on sewing her a few items. Here below, I have a Flyers Hockey wet bag with rubber sheeting lining the inside and a diaper changing pad with a pocket to hold a few diapers and a package of wipes. It was such a challenge to find any NHL fabric to use- believe me. That is actually knit material I have from the largest size men's pajama pants that I could find at Model's to use as fabric for the project. My idea is to make a few bibs, burp cloths, and other accessories for the baby. We all realize that my brother-in-law Ron will be the poor soul toting the diaper bag around anyways. Might as well make it something he likes!
The pattern for the diaper clutch is from Toad's Treasures. This was a great tutorial that I found that had some really great illustrations for someone just starting out with sewing. This was a quick project and I suggest you check it out so you can make a million yourself! The wet bag... unfortunately I do not remember where the idea came from (sorry!). I know I saw it somewhere online while I was looking for baby diaper bag accessories via Google but I didn't write down the site or really use any pattern. (Again, sorry!)

Thursday, March 4, 2010

My First Attempt at Quilting...

I am trying to sew a wallet!


I found a tutorial at That Darn Kat for a project that looked fairly simple.

Altogether, it took me around 5 hours to complete, which I think was pretty good considering it was my first independent (non classroom) sewing project ever. It you are a total beginner, like me, it may not be the easiest tutorial to follow. I got a little tripped up at the section that made the credit card pockets as well as the simple direction to "assemble the pieced top". Lol. I had to make some guesses on that one. Great project, though. I definitely recommend!

It turned out pretty cute-- take a look!