Thursday, January 27, 2011

Camera Woes

After all of the crazy craft rush towards Christmas,  I took a few weeks off from creating.

This week I am back in the saddle again! I made two cute purses using the Buttercup Bag pattern that I found online (for free!)

My camera is being stupid so I cannot post pictures yet-- but I will.
I will, however, describe them here.

The first bag is made with a nylon sequin fabric in teal and black-- sparkly and so cute! The bag has a bright orange lining and a magnetic closure. I made that bag for my friend Sam. This weekend past she really took care of me and I wanted to make something for her to show how much I appreciated it.

The second bag I made with black, white, and grey dotted fabrics (3 different patterns). I used a sunken zipper modification on the pattern and sewed the handle into the top seam between the lining and the exterior. This bag I made for my boyfriend's mom. It is her Christmas Pollyanna gift. In his family, Christmas happens 3 times a year with different sections of the family. This Sunday is the 3rd Christmas this season at his grandmother's in Maryland. I hope she likes it. His mom isn't really frivolous (like me) so it was really hard to figure out what to make/get her.

Pictures pending, I promise.

Thursday, January 13, 2011

SAVE 2011

Time for my annual S.A.V.E. scrapbook retreat.

Don't miss me too much while I am gone. I'll be back and posting on Monday!

Monday, January 3, 2011

Pay It Forward!

The Fabric Addict started the New Year out with a fantastic idea incorporating the Pay It Forward mentality. I am hoping to take part in this over the next couple of months! Leave a comment here and blog about this awesome idea, too.

"Pay It Forward" is the idea that random acts of kindness are given without expecting anything in return. It's passing on a kindness hoping that your recipients will do the same, forming a never-ending chain of goodwill-- that's what this is all about. As a bonus, this is also a great way to connect with our fellow crafters, to network,  and to share our enjoyment of crafting instead of just keeping it to ourselves or where only friends and family get to see it.
Here is how Pay It Forward works in Blogland: Make a comment on this post. The first three people who comment will receive a handmade gift from me within the next few months! I will be contacting you for your mailing address so please make sure you post that in your comment too or make sure your blogger profile has your email address listed. The first three people that comment will post this same idea on their own blogs and commit to making a gift for the first three people who comment on their post and so on and so forth.
So, in short, the first three people to comment here will get something handmade by me (providing they also make a Pay it Forward post on their own blog).  I'll be reading your blog to figure out what to make you and to make sure that you have posted about your Pay it Forward!


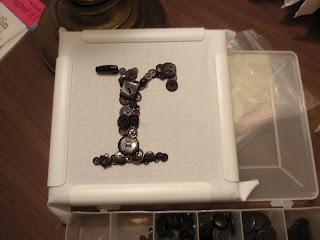
Tutorial: Button Monogram Art


I apologize it has taken quite so long to get this tutorial posted! As I know I have mentioned a time or two—it has been a busy couple on months.
Anyway, here goes!
 

Tutorial: Button Monogram Art 
 
Materials:
Canvas or frame
Piece of scrap fabric
50-200 buttons of the same color (give or take, considering your project size and the size of your buttons)
Needle and Thread to match the button color
Staple gun with staples
Initial template (hand drawn or printed from a computer)
Embrodery hoop
Straight pins


1.       1. First figure out what size frame or canvas you are trying to cover. Add an inch all around to allow for overlap and attaching at the end.

2.       2. Once you have your size figured out, sketch up the initial you want to recreate. You can freehand a template or print out a font on the computer.

3.       3. To actually start working, take your piece of fabric and stretch it out over an embroidery hoop.

4.       4. Pin your monogram onto the center of your stretched fabric.

5.       5. Now, bust out your button collection! There was two ways to go about laying out your buttons to the monogram. Way one: take out your button collection and lay out all of your buttons over a second paper copy of the initial template to see where and how to affix your embellishments. I did this with my first uppercase letter.  It worked out well—I took a digital photo of the layout before moving any buttons so as to preserve my hard work. Way two: wing it! That is the approach that I took for the lowercase letter.

6.       6. Starting with larger sized buttons, take a needle and thread and attach buttons thru the initial template. Don’t worry; you can cut the paper away later. 

7.       7. Once you have your main, base buttons attached, cut away the paper. If you wait to do this later on after the small buttons are sewn are, it is much harder to remove the paper cleanly. (You can wait, though if you want. I did for the first monogram!)

8.       8. If you did decide to keep the paper on thru to the small size buttons, take small scissors and start clipping away the paper that you are able to reach. To make it easier, remove the fabric from the hoop. Please be CAREFUL not to cut any threads you have in and around the paper.  

9.       9. Remove your fabric from the hoop (if you haven’t already). Lay the piece face down on a counter. If you used buttons with back loop shanks, you may want to lay the piece down on a slightly padded surface. Lay your canvas or frame over top your fabric, centered. Take your fabric at the top and fold it over the back of the frame. Place one staple in the top center. Fold the bottom of the fabric over the back. Pull taught and place a staple in the bottom center of the fabric. Repeat steps for the left and right side of the canvas.  Starting at the top again, pull your fabric taught along the edge, placing a few staples along the way. 

10.   10. If there is any extra bulk fabric on the back, trim around the staples so the back of the artwork can lay flat against the wall.

11.   11. Hang up—and done!

Sunday, January 2, 2011

A Christmas Plushie (Results!)

Remember how I was making a mini-dad for Christmas?
Well, what do you think? I think it turned out pretty cute. This is my first ever plushie and I think I learned some things about construction while creating it.

It is important to think about how you are going to seam the whole figure together BEFORE actually constructing any of the pieces. I also spent a good deal of time logic-ing out the front and back designs-- the template I created was for only the front of the figure.

Well, anyway. What do you think?

Saturday, January 1, 2011

Congratulations, Caitlin and James!

Last night was my sister Caitlin's wedding. It was great fun-- I did a lot of special projects for her special day that have been taking me away from posting new items on the blog.


Now with it done and Christmas over, I will have more time to devote to the site! More later on all of my crafty presents I gave and received in 2010.


Happy New Year, friends!